During this six-week Chingu voyage, our team will design, develop, and launch BrightPath, a custom platform for online courses that will cover niche tech topics not currently addressed elsewhere.
All courses—including videos, readings, activities, and quizzes—will be freely available to the public. Users can log in to access course content and track their progress.
Upon completing all required lessons and assessments for a given course, users will be issued a verified BrightPath certificate that can be shared on LinkedIn and other web platforms to demonstrate their achievement.
Our practical, project-based courses will help learners stay at the forefront of the ever-evolving tech landscape.
BrightPath is built to offer free, project-based learning experiences. Users will find interactive content, gain hands-on skills, and earn verifiable certificates that showcase their achievements.
Features
Free, Public Access: Courses are freely accessible to all users.
Personalized Learning: Login functionality enables users to track their progress.
Certificates of Completion: Highlight learning accomplishments on LinkedIn or other platforms.
Rich Content: Courses include videos, readings, activities, and assessments.
Tech Stack
Frontend: Next.js (hosted on Netlify)
Backend: Express.js (hosted on Railway)
Database: PostgreSQL
Other: OAuth Authentication
We invite you to explore the platform and join us in shaping the future of online learning! 🎓✨
Team Documents
You may find these helpful as you work together to organize your project.
Meeting – Sprint Retrospective, Review, and Planning –> ./docs/meeting-sprint_retrospective_review_and_planning.docx
Meeting – Sprint Open Topic Session –> ./docs/meeting-sprint_open_topic_session.docx
Our Team
Everyone on your team should add their name along with a link to their GitHub
& optionally their LinkedIn profiles below. Do this in Sprint #1 to validate
your repo access and to practice PR’ing with your team before you start
coding!
Check a GitHub repository for info about releases. With this
your code can react to the info returned.
Purpose
Restore a level of control to a creator who cares enough
about their content to implement a solution, like what
is found in this repository, when a platform limits their
choices. Necessity is the mother of invention
How it works
The Version Check Client fetches info from a GitHub repository
and looks for infomation in the repository’s ReadMe or Releases.
The two modes are explained below.
WARNING: The GitHub API throttles at 5000 requests per hour.
Please do not abuse.
Modes
ReadMe
The ReadMe mode fetches the README files from a repository.
The file can be named README.md or README. It is case insensitive.
If GitHub auto displays your readme file when browsing to your
repository then this code will work.
The content of the README file is parsed looking for html
comments in the format below.
<!-- name|version|IsDisabled -->
Field
Description
name
This value is mapped to ReadMeValues.Name
version
This value is mapped to ReadMeValues.Version
IsDisabled
This value is mapped to ReadMeValues.IsDisabled as true or false. It only maps to true if the value is IsDisabled. Anything else maps to false.
Example Readme.md
In this example all pre-v1.0.0 version of the digitalroot.mods.betterclubs mod are disabled.
The Releases mode fetches all the Releases from a repository.
The content of the Releases (body) is parsed looking for an html
comment in the format below.
<!-- IsDisabled -->
Field
Description
Name of the release
This value is mapped to Release.Name
Tag name of the release
This value is mapped to Release.Tag
IsDisabled
This value is mapped to Release.IsDisabled as true or false. It only maps to true if <!-- IsDisabled --> is found in the release body. If it is not found then Release.IsDisabled is set to false.
Errors
If the VersionCheckClient encounters any errors, Results.IsErrored
is set to true and Results.Exception is set to the exception encountered.
There are many ways to use the this library. What an author does
with a disabled release is left up to the author. Here are a few examples.
ReadMe
// GitHub repository url format. https://github.com/githubtraining/hellogitworld// GitHub repository url format. https://github.com/{owner}/{name}// Create VersionCheckClientusingvarversionCheckClient=newVersionCheckClient("githubtraining","hellogitworld",VersionCheckMode.ReadMe);// Execute the requestvarresults=versionCheckClient.Execute();// Get the result for a specific name and version.varreadMeValues=results.ReadMeValues.FirstOrDefault(r =>r.Name=="digitalroot.mods.betterclubs"&&r.Version=="1.0.0");if(readMeValues?.IsDisabled==true){// The release is marked as disabled.// Add your code here for how you want to handle a disabled release.}else{// The release was not found or it is not marked as disabled.// Add your code here for how you want to handle an enabled release.}
Releases
// GitHub repository url format. https://github.com/githubtraining/hellogitworld// GitHub repository url format. https://github.com/{owner}/{name}// Create VersionCheckClientusingvarversionCheckClient=newVersionCheckClient("githubtraining","hellogitworld",VersionCheckMode.Releases);// Execute the requestvarresults=versionCheckClient.Execute();// Get the result for a specific tag.varrelease=results.Releases.FirstOrDefault(r =>r.Tag=="RELEASE_1.1");if(release?.IsDisabled==true){// The release is marked as disabled.// Add your code here for how you want to handle a disabled release.}else{// The release was not found or it is not marked as disabled.// Add your code here for how you want to handle an enabled release.}
❤️ We proudly support the community by developing Laravel packages and giving them away for free. If this package saves you time or if you’re relying on it professionally, please consider sponsoring the maintenance and development and check out our latest premium package: Inertia Table. Keeping track of issues and pull requests takes time, but we’re happy to help!
Features
Starts and configures a MinIO server for your tests.
If you’re using php artisan serve, make sure you don’t use the --no-reload flag, as the .env file will be changed on-the-fly.
Optionally, if you want persistent storage across the test suite, you may start the server manually before the tests are run.
jobs:
test:
steps:
- uses: actions/checkout@v2
- name: Download MinIO S3 server and clientrun: | wget https://dl.minio.io/server/minio/release/linux-amd64/minio -q -P /usr/local/bin/ wget https://dl.minio.io/client/mc/release/linux-amd64/mc -q -P /usr/local/bin/ chmod +x /usr/local/bin/minio chmod +x /usr/local/bin/mc minio --version mc --version
- name: Run MinIO S3 serverrun: | mkdir ~/s3 sudo minio server ~/s3 --json > minio-log.json &
- name: Configure MinIO S3run: | mc config host add local http://127.0.0.1:9000 minioadmin minioadmin mc admin user add local user password mc admin policy set local readwrite user=user mc mb local/bucket-name --region=eu-west-1
- name: Upload Minio Logs (optional)if: failure()uses: actions/upload-artifact@v2with:
name: miniopath: minio-log.json
In this case, you also need to supply an environment file with the MinIO configuration. This makes the configuration also accessible by the browser session when you’re running Laravel Dusk.
Laravel Eloquent Scope as Select: Stop duplicating your Eloquent query scopes and constraints in PHP. This package lets you re-use your query scopes and constraints by adding them as a subquery.
Laravel FFMpeg: This package provides an integration with FFmpeg for Laravel. The storage of the files is handled by Laravel’s Filesystem.
Laravel Paddle: Paddle.com API integration for Laravel with support for webhooks/events.
Laravel Task Runner: Write Shell scripts like Blade Components and run them locally or on a remote server.
Laravel Verify New Email: This package adds support for verifying new email addresses: when a user updates its email address, it won’t replace the old one until the new one is verified.
Laravel XSS Protection: Laravel Middleware to protect your app against Cross-site scripting (XSS). It sanitizes request input, and it can sanatize Blade echo statements.
Security
If you discover any security-related issues, please email code@protone.media instead of using the issue tracker. Please do not email any questions, open an issue if you have a question.
Poni (stylized poni) is a file/stream encryption software meant to aid in the symmetric encryption of files, messages, and anything that can come through the standard input. This software is largely untested and no warranty is made about its security. Using this software is to be done at your own risk. This is not to say that the code is unsafe or that the primitives that it relies on are insecure but rather that this specific repository has not been audited by anyone with the qualifications to do so.
Poni aims to protect your personal information using strong symmetric encryption in the form of AES-256 in GCM mode providing both message encryption and authentication in one go. This means that your ciphertext cannot be tampered with without failing the authentication check. Data integrity is important which is why it is not enough to encrypt alone. To this end poni bakes in authenticated encryption.
To make things easier on the end user poni includes a keygen which can both create a new key from a password or a passphrase or rederive a key from a known passphrase and salt. The keygen function leverages the scrypt key derivation function with an N-factor of 131,072 to derive a strong, secure key from a password or passphrase. Poni enforces a minimum password/passphrase length of 10 characters to provide the strongest keys possible.
Usage
Poni currently supports the following commands, though more are planned for the future:
encrypt
decrypt
keygen
keyexchange
Each of these commands have their own respective usages which can be accessed through the -h flag for each.
Encrypt
This command provides message, file, and stdin encryption using a pre-generated key. The key can be generated using the keygen command.
poni encrypt -k <key> [-p <message>] [-f <file>] [<stdin>]

-k <key>              The key to use for encryption
[-a]                  Armor the output using Base64 encoding
[-m <message>]        A message provided in plain text to encrypt
[-f <file>]           A file name whose contents will be encrypted
<nothing>             By default, poni will encrypt whatever comes
                      through stdin
Decrypt
This command provides message, file, and stdin decryption using a pre-generated key. The key can be generated using the keygen command.
poni decrypt -k <key> [-p <message>] [-f <file>] [<stdin>]

-k <key>              The key to use for decryption
[-s]                  Encode the output using string encoding
[-m <message>]        A message provided in plain text to decrypt
[-f <file>]           A file name whose contents will be derypted
<nothing>             By default, poni will decrypt whatever comes
                      through stdin
Keygen
This command provides key generation and rederivation using a password or passphrase. The keygen command uses the scrypt key derivation function with an N-factor of 131,072 to derive a strong, secure key from a password or passphrase. The keygen command enforces a minimum password/passphrase length of 10 characters to provide the strongest keys possible.
poni keygen -p <password> [-s <salt>]

-p <password>         A password or passphrase to use for key generation
[-s <salt>]           A salt to use for key generation
Keyexchange
This command provides a way to generate a shared secret through an unsecured channel using the Elliptical Curve Diffie-Hellman Key Exchange (ECDHKE) algorithm on the X25519 curve. This command is meant to be used in conjunction with the encrypt and decrypt commands to provide a way to encrypt and decrypt messages without having to share a key beforehand. The keyexchange command will output a public key which can be shared with the other party. The other party will then provide their public key to the keyexchange command which will then output a shared secret which can be used as a key for the encrypt and decrypt commands.
Usage: poni keyexchange [-generate-keys] [-generate-shared] [-k <private-key>] [-r <public-key>]

[-generate-keys]              Generate initial key pairs
[-generate-shared]            Generate shared secret
        -k <key>              The private key to use for key exchange (required)
        -r <key>              The public key to use for key exchange (required)
A complete key exchange would look something like this:
# Alice
$ poni keyexchange -generate-keys
Private key: XjhGxThmlIoQk27qgWnuAqzHEWxFk9U0SWgtPlCZLIE=
Public key: Ca5tFXzqUXkGGBcPzT6fNBZfTwirKPtSNU0BA+uKz38=

# Bob
$ poni keyexchange -generate-keys
Private key: gmZsULnQPPPIVa8oClCd9XvV8v3JM/HU94YNfW8z1jc=
Public key: JuOQ5C/s3SSawsT1jTzYW8s1hk9ahaB2iGiHu3RMWG8=

# Alice
$ poni keyexchange -k XjhGxThmlIoQk27qgWnuAqzHEWxFk9U0SWgtPlCZLIE= -r JuOQ5C/s3SSawsT1jTzYW8s1hk9ahaB2iGiHu3RMWG8=
Shared secret: m5YRm+cz5lKdSfQ6gdzsv8MajXBO/LYqD0lhZKrcJQA=

# Bob
$ poni keyexchange -k gmZsULnQPPPIVa8oClCd9XvV8v3JM/HU94YNfW8z1jc= -r Ca5tFXzqUXkGGBcPzT6fNBZfTwirKPtSNU0BA+uKz38=
Shared secret: m5YRm+cz5lKdSfQ6gdzsv8MajXBO/LYqD0lhZKrcJQA=
License
This software is licensed under the MIT license. See the LICENSE.md file for more information.
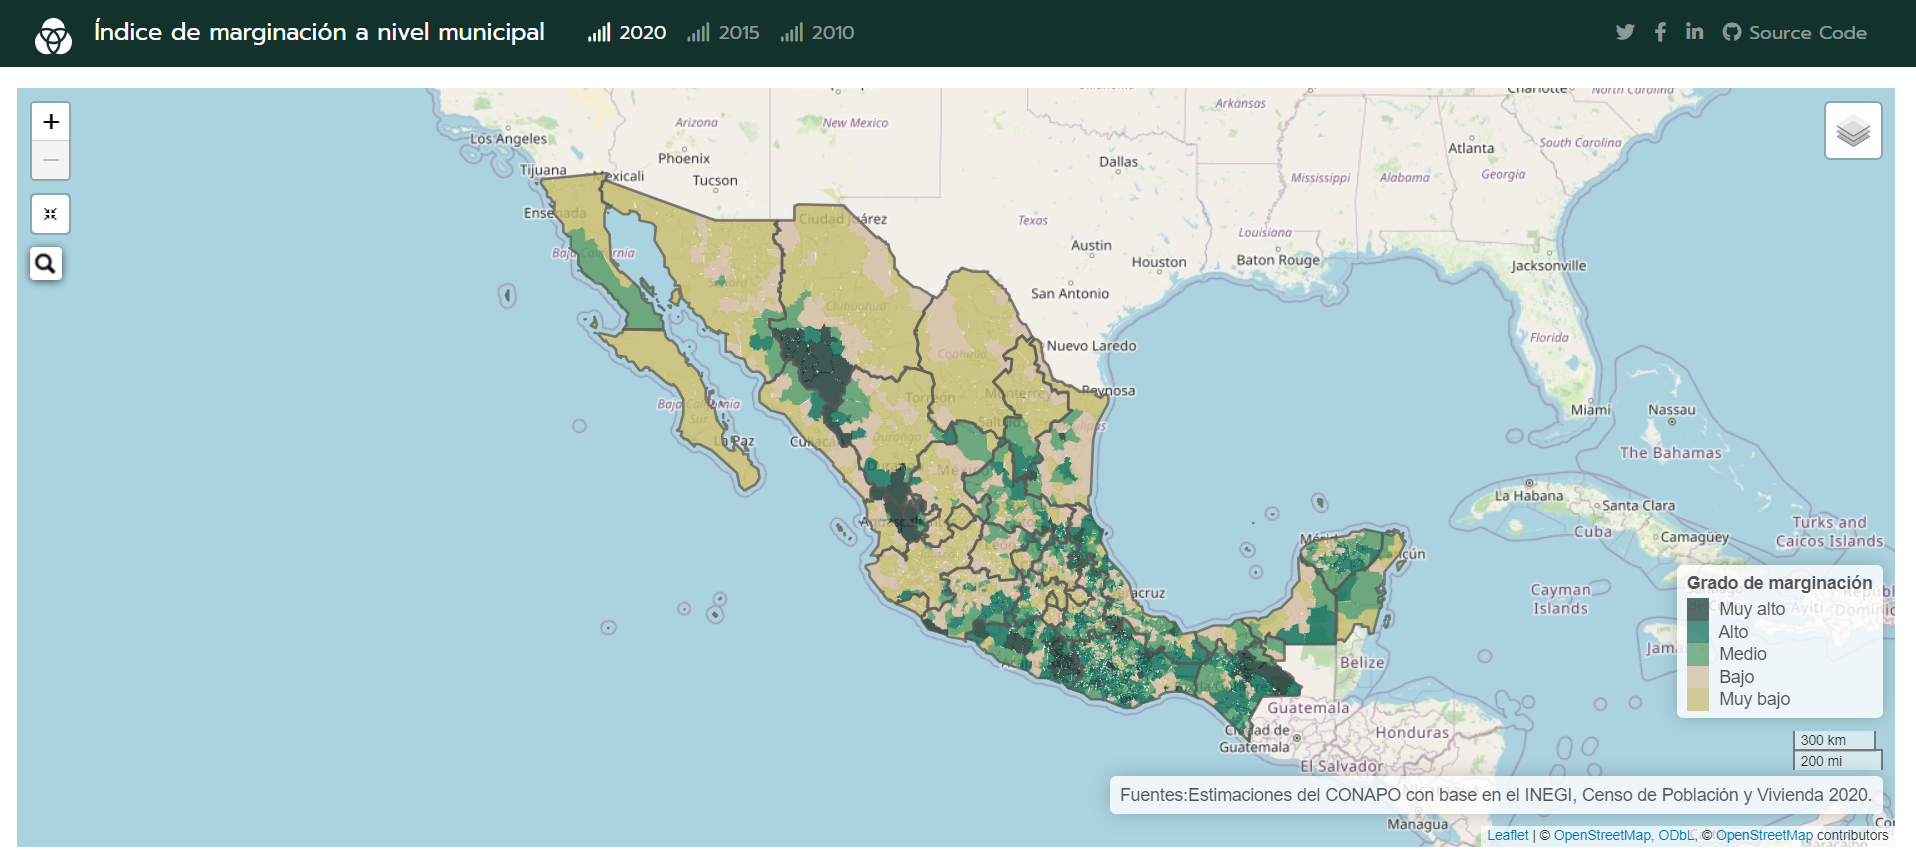
Mapa dinámico del índice de marginación a nivel municipal
La composición de los archivos en los tres años tiene la misma
estructura de archivos:
01_Bases_*.R.- Se estructuran las bases del índice de marginación
y se les da un formato simple .RData.
02_Shapefiles_*.Rmd .- Se leen los shapefiles y se tratan de
simplificar los archivos de tamaño para convertirlos en archivos
.geojson.
+ Además de que se dividen en cinco archivos por cada grado de marginación.
03_State_popup. Rmd. – Se le da estructura a los popup’s que
aparecen en el leaflet.
03.01_State_popup_Modificado.Rmd. – Se reestructuran los popup’s
para simplificar su tamaño. Utilizando también el archivo
css_style.css que da el estilo a las etiquetas.
04_Leaflet_2020.Rmd. – Estructura del mapa leaflet a nivel
municipal.
css_style.css. – Este archivo da formato a los colores de los
popup’s del mapa de leaflet.


 https://github.com/chingu-voyages/BrightPath