hiss is simple cli tool to control the database schema. If you care
a stable enterprise service, You need to know hiss cli.
If you designed the schema of development environment database, and you
want to move it to a production server.
It would be difficult and unstable. hiss can help to migrate for
deployment and also help to ETL for another database engine.
Installation
hiss can be installed pypi.
$ pip install hiss-cli
Features (Plan)
Supporting common databases (MySQL, MSSQL, PostgreSQL, MariaDB,
Oracle)
Controlling revision history of changes the schema.
Commit, Rollback, Push, Reset, Tag, List, Show (The simple command
designs based on Git.
ETL to another database and analyze (To another common databases or
distribute engines: Athena, Presto, Impala, Druid, Hadoop system, or
JSON, XML, CSV)
Design (Plan)
$ hiss init
$ hiss remote add origin database.endpoint.com:3306
> connecting... done.
> database `MySQL`, v5.7.11
> Type username: {username}
> Type password: {password}
$ hiss show databases
> couting databses: 32.
> databse_1_schema
> databse_2_schema
> databse_3_schema
> more...
$ hiss checkout database_1_schema
> switched to database `database_1_schema`.
$ hiss show tables
> counting tables: 160.
> information_schema
> table_1_sample
> table_2_sample
> table_3_sample
$ hiss set tables table_1_sample
> now your current table is `table_1_sample`.
$ hiss add column new_column int(64) pk auto_increment default 0 not null -m 'column comment'> add column `new_column`, done.
$ hiss status
> counting changes: 1, done.
> add column 'new_column' int(64) primary auto_increment default 0 not null
>: column comment
> end
$ hiss commit -m 'add new column for testing'.
> 1 changes are committed, 1 add(+), 0 remove(-), 0 modified(=).
$ hiss reset HEAD^ --hard
> reset... done.
>: first commit message.
$ hiss tag -a v1.0 -m 'marking for first commition.'> done.
Notice
This repository is still progress under development.
If you want to use the demo version, Please send a message via gitter
(Check the above badge).
Join the Telegram channel to stay updated, report bugs, or request custom data mining scripts.
PyPaperBot
PyPaperBot is a Python tool for downloading scientific papers and bibtex using Google Scholar, Crossref, SciHub, and SciDB.
The tool tries to download papers from different sources such as PDF provided by Scholar, Scholar related links, and Scihub.
PyPaperbot is also able to download the bibtex of each paper.
Features
Download papers given a query
Download papers given paper’s DOIs
Download papers given a Google Scholar link
Generate Bibtex of the downloaded paper
Filter downloaded paper by year, journal and citations number
Query to make on Google Scholar or Google Scholar page link
string
–skip-words
List of comma separated words i.e. “word1,word2 word3,word4”. Articles containing any of this word in the title or google scholar summary will be ignored
string
–cites
Paper ID (from scholar address bar when you search cites) if you want get only citations of that paper
string
–doi
DOI of the paper to download (this option uses only SciHub to download)
string
–doi-file
File .txt containing the list of paper’s DOIs to download
string
–scholar-pages
Number or range of Google Scholar pages to inspect. Each page has a maximum of 10 papers
string
–dwn-dir
Directory path in which to save the result
string
–min-year
Minimal publication year of the paper to download
int
–max-dwn-year
Maximum number of papers to download sorted by year
int
–max-dwn-cites
Maximum number of papers to download sorted by number of citations
int
–journal-filter
CSV file path of the journal filter (More info on github)
string
–restrict
0:Download only Bibtex – 1:Download only papers PDF
int
–scihub-mirror
Mirror for downloading papers from sci-hub. If not set, it is selected automatically
string
–annas-archive-mirror
Mirror for downloading papers from Annas Archive (SciDB). If not set, https://annas-archive.se is used
string
–scholar-results
Number of scholar results to bedownloaded when –scholar-pages=1
int
–proxy
Proxies to be used. Please specify the protocol to be used.
string
–single-proxy
Use a single proxy. Recommended if using –proxy gives errors.
string
–selenium-chrome-version
First three digits of the chrome version installed on your machine. If provided, selenium will be used for scholar search. It helps avoid bot detection but chrome must be installed.
int
–use-doi-as-filename
If provided, files are saved using the unique DOI as the filename rather than the default paper title
bool
-h
Shows the help
—
Note
You can use only one of the arguments in the following groups
–query, –doi-file, and –doi
–max-dwn-year and and max-dwn-cites
One of the arguments –scholar-pages, –query , and –file is mandatory
The arguments –scholar-pages is mandatory when using *–query *
The argument –dwn-dir is mandatory
The argument –journal-filter require the path of a CSV containing a list of journal name paired with a boolean which indicates whether or not to consider that journal (0: don’t consider /1: consider) Example
The argument –doi-file require the path of a txt file containing the list of paper’s DOIs to download organized with one DOI per line Example
Use the –proxy argument at the end of all other arguments and specify the protocol to be used. See the examples to understand how to use the option.
SciHub access
If access to SciHub is blocked in your country, consider using a free VPN service like ProtonVPN
Also, you can use proxy option above.
Example
Download a maximum of 30 papers from the first 3 pages given a query and starting from 2018 using the mirror https://sci-hub.do:
ShortLink is a simple URL Shortening script powered purely by PHP.
Check ShortLink: https://azetrix.xyz/
~ REINVENTING THE WHEEL ~
Update: We currently have no funding to support the development of this application. We are suspending its development until further notice. This might take weeks in duration. (6/9/2017)
Update: The development of this project is now active. We have reconstructed everything to comply with the common modern-PHP coding practices. (11/23/2018)
Features
It can create up to 15.625 billion unique URLs in 6 or less characters.
It has the ability to create custom links up to 20 Characters.
It has a beautiful modern UI. Powered by Bulma CSS.
Domain blacklist with shell wildcard support.
ShortLink blacklist with shell wildcard support.
Predefined blacklist for inappropriate domains and custom ShortLinks.
Google reCAPTCHA integration is now built-in.
Supports link preview and force redirection.
Prerequisites
MySQL Database
PHP
Apache Server
Installation
Upload all files to your web root.
Rename sample.htaccess to .htaccess if you’re using Apache Server.
Create new MySQL Database.
Set your MySQL credentials at inc/vars.php.
Set your web root in SHORTLINK_PREFIX at inc/vars.php.
Set your contact email in CONTACT_EMAIL at inc/vars.php.
Optionally, you can modify the $kw_blacklist (keyword blackist) and $dom_blacklist (domain blacklist) at inc/vars.php to suit your needs.
Intel(R) Core(TM) i7-8550U CPU @ 1.80GHz (max 4.00Ghz) Kaby Lake R
✅
RAM
32 GB 2400 MHz DDR4
✅
Internal Graphics Card
Intel® UHD Graphics 620
✅
Wi-Fi
Intel 8265
✅
Ethernet
Intel I219
✅
Audio
Conexant CX8200
✅
macOS Update History
✅ macOS Ventura 13.0
✅ macOS Monterey 12.6
✅ macOS Monterey 12.3
✅ macOS Monterey 12.0.1
✅ macOS Big Sur 11.6.1
✅ macOS Big Sur 11.0.1
What’s working 💻
Type
Status
Turbo boost and CPU frequency stage
✅
Intel HD Graphics
✅
Brightness control
✅
HDMI
✅
Audio
✅
Ethernet
✅
Wi-Fi and Bluetooth
✅
USB 3.0 (with Port Map)
✅
Touchpad (14 gestures are working)
✅
Battery status
✅
Shutdown / Reboot
✅
Fn shortcut keys
✅
What’s not working 💻
Type
Status
Camera
❌
S3 Sleep / Wake
❌
S4 Hibernation / Wake
❌
What’s you have to do 💻
Type
Info
Status
SMBIOS Settings
With [GenSMBIOS] you should definitely set your SMBIOS settings and ROM value for iCloud and Apple services. ROM value is your ethernet MAC address. Be sure your ethernet is en0 in Hackintool.
[Battery] Allows reading Embedded Controller fields over 1 byte long, vastly reducing the amount of ACPI modification needed (if any) for working battery status.
react-flip-toolkit uses springs for animations. To customize the spring, you can pass in a preset name:
// spring preset can be one of: "stiff", "noWobble", "gentle", "veryGentle", or "wobbly"<FlipperflipKey='foo'spring='wobbly'>{/* Flipped components go here...*/}</Flipper>
or a custom spring config:
<FlipperflipKey='foo'spring={{stiffness: 280,damping: 22}}>{/* Flipped components go here...*/}</Flipper>
Interesting animations often involve scale transforms in addition to simple translate transforms. The problem with scale animations has to do with children — if you scale a div up 2x, you will warp any children it has by scaling them up too, creating a weird-looking animation. That’s why this library allows you to wrap the child with a Flipped component that has an inverseFlipId to counteract the transforms of the parent:
<FlippedflipId={id}><div><FlippedinverseFlipId={id}scale><div>some text that will not be warped</div></Flipped></div></Flipped>
By default, both the scale and the translation transforms of the parent will be counteracted (this allows children components to make their own FLIP animations without being affected by the parent).
But for many use cases, you’ll want to additionally specify the scale prop to limit the adjustment to the scale and allow the positioning to move with the parent.
Note: the DOM element with the inverse transform should lie flush against its parent container for the most seamless animation.
That means any layout styles — padding, flexbox, etc—should be applied to the inverted container (the element wrapped with a Flipped component with an inverseFlipId) rather than the parent Flipped container.
The parent wrapper component that contains all the elements to be animated. You’ll often need only one of these per page, but sometimes it will be more convenient to have multiple Flipper regions of your page concerned with different transitions.
<FlipperflipKey={someKeyThatChanges}>{/* children */}</Flipper>
Basic Props
prop
default
type
details
flipKey (required)
–
string, number, bool
Changing this tells react-flip-toolkit to transition child elements wrapped in Flipped components.
children (required)
–
node
One or more element children
spring
noWobble
string or object
Provide a string referencing one of the spring presets — noWobble (default), veryGentle, gentle, wobbly, or stiff, OR provide an object with stiffness and damping parameters. Explore the spring setting options here. The prop provided here will be the spring default that can be overrided on a per-element basis on the Flipped component.
applyTransformOrigin
true
bool
Whether or not react-flip-toolkit should apply a transform-origin of “0 0” to animating children (this is generally, but not always, desirable for FLIP animations)
element
div
string
If you’d like the wrapper element created by the Flipped container to be something other than a div, you can specify that here.
className
–
string
A class applied to the wrapper element, helpful for styling.
staggerConfig
–
object
Provide configuration for staggered Flipped children. The config object might look something like the code snippet below:
staggerConfig={{// the "default" config will apply to staggered elements without explicit keysdefault: {// default direction is forwardsreverse: true,// default is .1, 0 < n < 1speed: .5},// this will apply to Flipped elements with the prop stagger='namedStagger'namedStagger : {speed: .2}}}
Advanced Props
prop
default
type
details
decisionData
–
any
Sometimes, you’ll want the animated children of Flipper to behave differently depending on the state transition — maybe only certain Flipped elements should animate in response to a particular change. By providing the decisionData prop to the Flipper component, you’ll make that data available to the shouldFlip and shouldInvert methods of each child Flipped component, so they can decided for themselves whether to animate or not.
debug
false
boolean
This experimental prop will pause your animation right at the initial application of FLIP-ped styles. That will allow you to inspect the state of the animation at the very beginning, when it should look similar or identical to the UI before the animation began.
portalKey
–
string
In general, the Flipper component will only apply transitions to its descendents. This allows multiple Flipper elements to coexist on the same page, but it will prevent animations from working if you use portals. You can provide a unique portalKey prop to Flipper to tell it to scope element selections to the entire document, not just to its children, so that elements in portals can be transitioned.
onStart
–
function
This callback prop will be called before any of the individual FLIP animations have started. It receives as arguments the HTMLElement of the Flipper and the decisionData object described elsewhere.
onComplete
–
function
This callback prop will be called when all individual FLIP animations have completed. Its single argument is a list of flipIds for the Flipped components that were activated during the animation. If an animation is interrupted, onComplete will be still called right before the in-progress animation is terminated.
handleEnterUpdateDelete
–
function
By default, react-flip-toolkit finishes animating out exiting elements before animating in new elements, with updating elements transforming immediately. You might want to have more control over the sequence of transitions — say, if you wanted to hide elements, pause, update elements, pause again, and finally animate in new elements. Or you might want transitions to happen simultaneously. If so, provide the function handleEnterUpdateDelete as a prop. The best way to understand how this works is to check out this interactive example.handleEnterUpdateDelete receives the following arguments every time a transition occurs:
handleEnterUpdateDelete({// this func applies an opacity of 0 to entering elements so// they can be faded in - it should be called immediately
hideEnteringElements,// calls `onAppear` for all entering elements
animateEnteringElements,//calls `onExit` for all exiting elements// returns a promise that resolves when all elements have exited
animateExitingElements,// the main event: `FLIP` animations for updating elements// this also returns a promise that resolves when// animations have completed
animateFlippedElements
})
The Flipped component produces no markup, it simply passes some props down to its wrapped child.
Wrapping a React Component
If you want to wrap a React component rather than a JSX element like a div, you can provide a render prop and then apply the flippedProps directly to the wrapped element in your component:
You can also simply provide a regular React component as long as that component spreads unrecognized props directly onto the wrapped element (this technique works well for wrapping styled components):
Wrap a single element, React component, or render prop child with the Flipped component
flipId (required unless inverseFlipId is provided)
–
string
Use this to tell react-flip-toolkit how elements should be matched across renders so they can be animated.
inverseFlipId
–
string
Refer to the id of the parent Flipped container whose transform you want to cancel out. If this prop is provided, the Flipped component will become a limited version of itself that is only responsible for cancelling out its parent transform. It will read from any provided transform props and will ignore all other props (besides inverseFlipId.) Read more about canceling out parent transforms here.
transformOrigin
"0 0"
string
This is a convenience method to apply the proper CSS transform-origin to the element being FLIP-ped. This will override react-flip-toolkit‘s default application of transform-origin: 0 0; if it is provided as a prop.
spring
noWobble
string or object
Provide a string referencing one of the spring presets — noWobble (default), veryGentle, gentle, wobbly, or stiff, OR provide an object with stiffness and damping parameters. Explore the spring setting options here.
stagger
false
boolean or string
Provide a natural, spring-based staggering effect in which the spring easing of each item is pinned to the previous one’s movement. Provide true to stagger the element with all other staggered elements. If you want to get more granular, you can provide a string key and the element will be staggered with other elements with the same key.
delayUntil
false
string (flipId)
Delay an animation by providing a reference to another Flipped component that it should wait for before animating (the other Flipped component should have a stagger delay as that is the only use case in which this prop is necessary.)
Callback props
The above animation uses onAppear and onExit callbacks for fade-in and fade-out animations.
Called when the element first appears in the DOM. It is provided a reference to the DOM element being transitioned as the first argument, and the index of the element relative to all appearing elements as the second. Note: If you provide an onAppear prop, the default opacity of the element will be set to 0 to allow you to animate it in without any initial flicker. If you don’t want any opacity animation, just set the element’s opacity to 1 immediately in your onAppear function.
Similar to onStart, but guaranteed to run for all FLIP-ped elements on the initial tick of the FLIP animation, before the next frame has rendered, even if the element in question has a stagger delay. It is provided a reference to the DOM element being transitioned as the first argument.
onSpringUpdate
springValue
Called with the current spring value (normally between 0 – 1 but might briefly go over or under that range depending on the level of “bounciness” of the spring). Useful if you’d like to tween other, non-FLIP animations in concert with a FLIP transition.
Called when the FLIP animation completes. It is provided a reference to the DOM element being transitioned as the first argument. (If transitions are interruped by new ones, onComplete will still be called.)
Called when the element is removed from the DOM. It must call the removeElement function when the exit transition has completed.
Transform props
By default the FLIP-ped elements’ translate, scale, and opacity properties are all transformed. However, certain effects require more control so if you specify any of these props, only the specified attribute(s) will be tweened:
prop
type
details
translate
bool
Tween translateX and translateY
scale
bool
Tween scaleX and scaleY
opacity
bool
Advanced props
Functions to control when FLIP happens
prop
arguments
details
shouldFlip
previousDecisionData, currentDecisionData
A function provided with the current and previous decisionData props passed down by the Flipper component. Returns a boolean to indicate whether a Flipped component should animate at that particular moment or not.
shouldInvert
previousDecisionData, currentDecisionData
A function provided with the current and previous decisionData props passed down by the Flipper component. Returns a boolean indicating whether to apply inverted transforms to all Flipped children that request it via an inverseFlipId.
Spring
As a convenience, react-flip-toolkit exports a tiny function to access the same spring system used to create FLIP transitions.
You can programmatically call the following functions if you need to disable (or re-enable) FLIP animations everywhere.
disableFlip()
Global switch to disable all animations in all Flipper containers.
enableFlip()
Global switch to (re-)enable all animations in all Flipper containers. Animations are enabled by default. Calling this function is needed only if animations were previously disabled with disableFlip().
isFlipEnabled()
Returns a boolean indicating whether animations are globally enabled or disabled.
Library details
Tested in latest Chrome, Firefox, Safari, and Edge with Browserstack.
Requires React 16+
Uses Rematrix for matrix calculations and a simplified fork of Rebound for spring animations
Troubleshooting
Problem #1: Nothing is happening
Make sure you’re updating the flipKey attribute in the Flipper component whenever an animation should happen.
If one of your Flipped components is wrapping another React component rather than a DOM element, use a render prop to get the Flipped props and pass down to the necessary DOM element.
Is the element that’s receiving props from Flipped visible in the DOM? react-flip-toolkit attempts to optimize performance by not animating elements that are off-screen or elements that have no width or height.
display:inline elements cannot be animated. If you want an inline element to animate, set display:inline-block.
Do you have the prefers-reduced-motion setting turned on? As of v7.1.0 that setting will disable all animations.
Problem #2: Things look weird / animations aren’t behaving
Check to make sure all flipIds are unique. At any point, there can only be one element with a specified flipId on the page. If there are multiple Flipped elements on the page with the same id, the animation will break.
Make sure you are animating the element you want to animate and not, for instance, a wrapper div. If you are animating an inline element like some text, but have wrapped it in a div, you’re actually animating the div, which might have a much wider width that you’d expect at certain points, which will throw off the animation. Check to see if you need to add an inline-block style to the animated element.
Make sure you don’t have any competing CSS transitions on the element in question.
If you are animating an image, try giving the image hard-coded dimensions and seeing if that fixes the problem. (If you are relying on the innate dimensions of the image, it might not have been fully rendered by the browser in time for the new image dimensions to be measured.)
Problem #3: It’s still not working
Try out the debug prop. If you still can’t figure out what’s going wrong, you can add the the debug prop directly on your Flipper component to pause transitions at the beginning.
If you think something might actually be broken, or are completely stuck, feel free to make an issue.
Performance
React-flip-toolkit does a lot of work under the hood to try to maximize the performance of your animations — for instance, off-screen elements won’t be animated, and style updates are batched to prevent layout thrashing.
However, if you are building particularly complex animations—ones that involve dozens of elements or large images— there are some additional strategies you can use to ensure performant animations.
Memoization
When you trigger a complex FLIP animation with react-flip-toolkit, React could be spending vital milliseconds doing unnecessary reconciliation work before allowing the animation to start. If you notice a slight delay between when the animation is triggered, and when it begins, this is probably the culprit. To short-circuit this possibly unnecessary work, try memoizing your component by using React.memo or PureComponent for your animated elements, and seeing if you can refactor your code to minimize prop updates to animated children when an animation is about to occur.
will-change:transform
.box {
  will-change: transform;
}
This CSS property tells the browser to anticipate changes to an element. It should be used with caution, because it can increase browser resource usage. If you notice rendering issues in your animation, try seeing if it increases the performance of the animation.
This project fetches live cryptocurrency data for the top 50 cryptocurrencies using the CoinMarketCap API, analyzes it, and updates a live Excel sheet every 5 minutes.
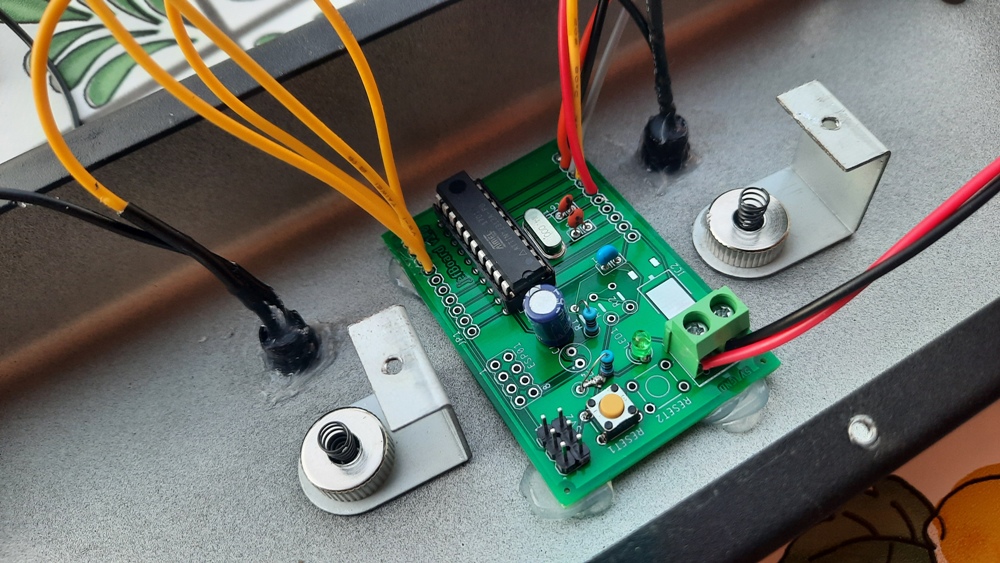
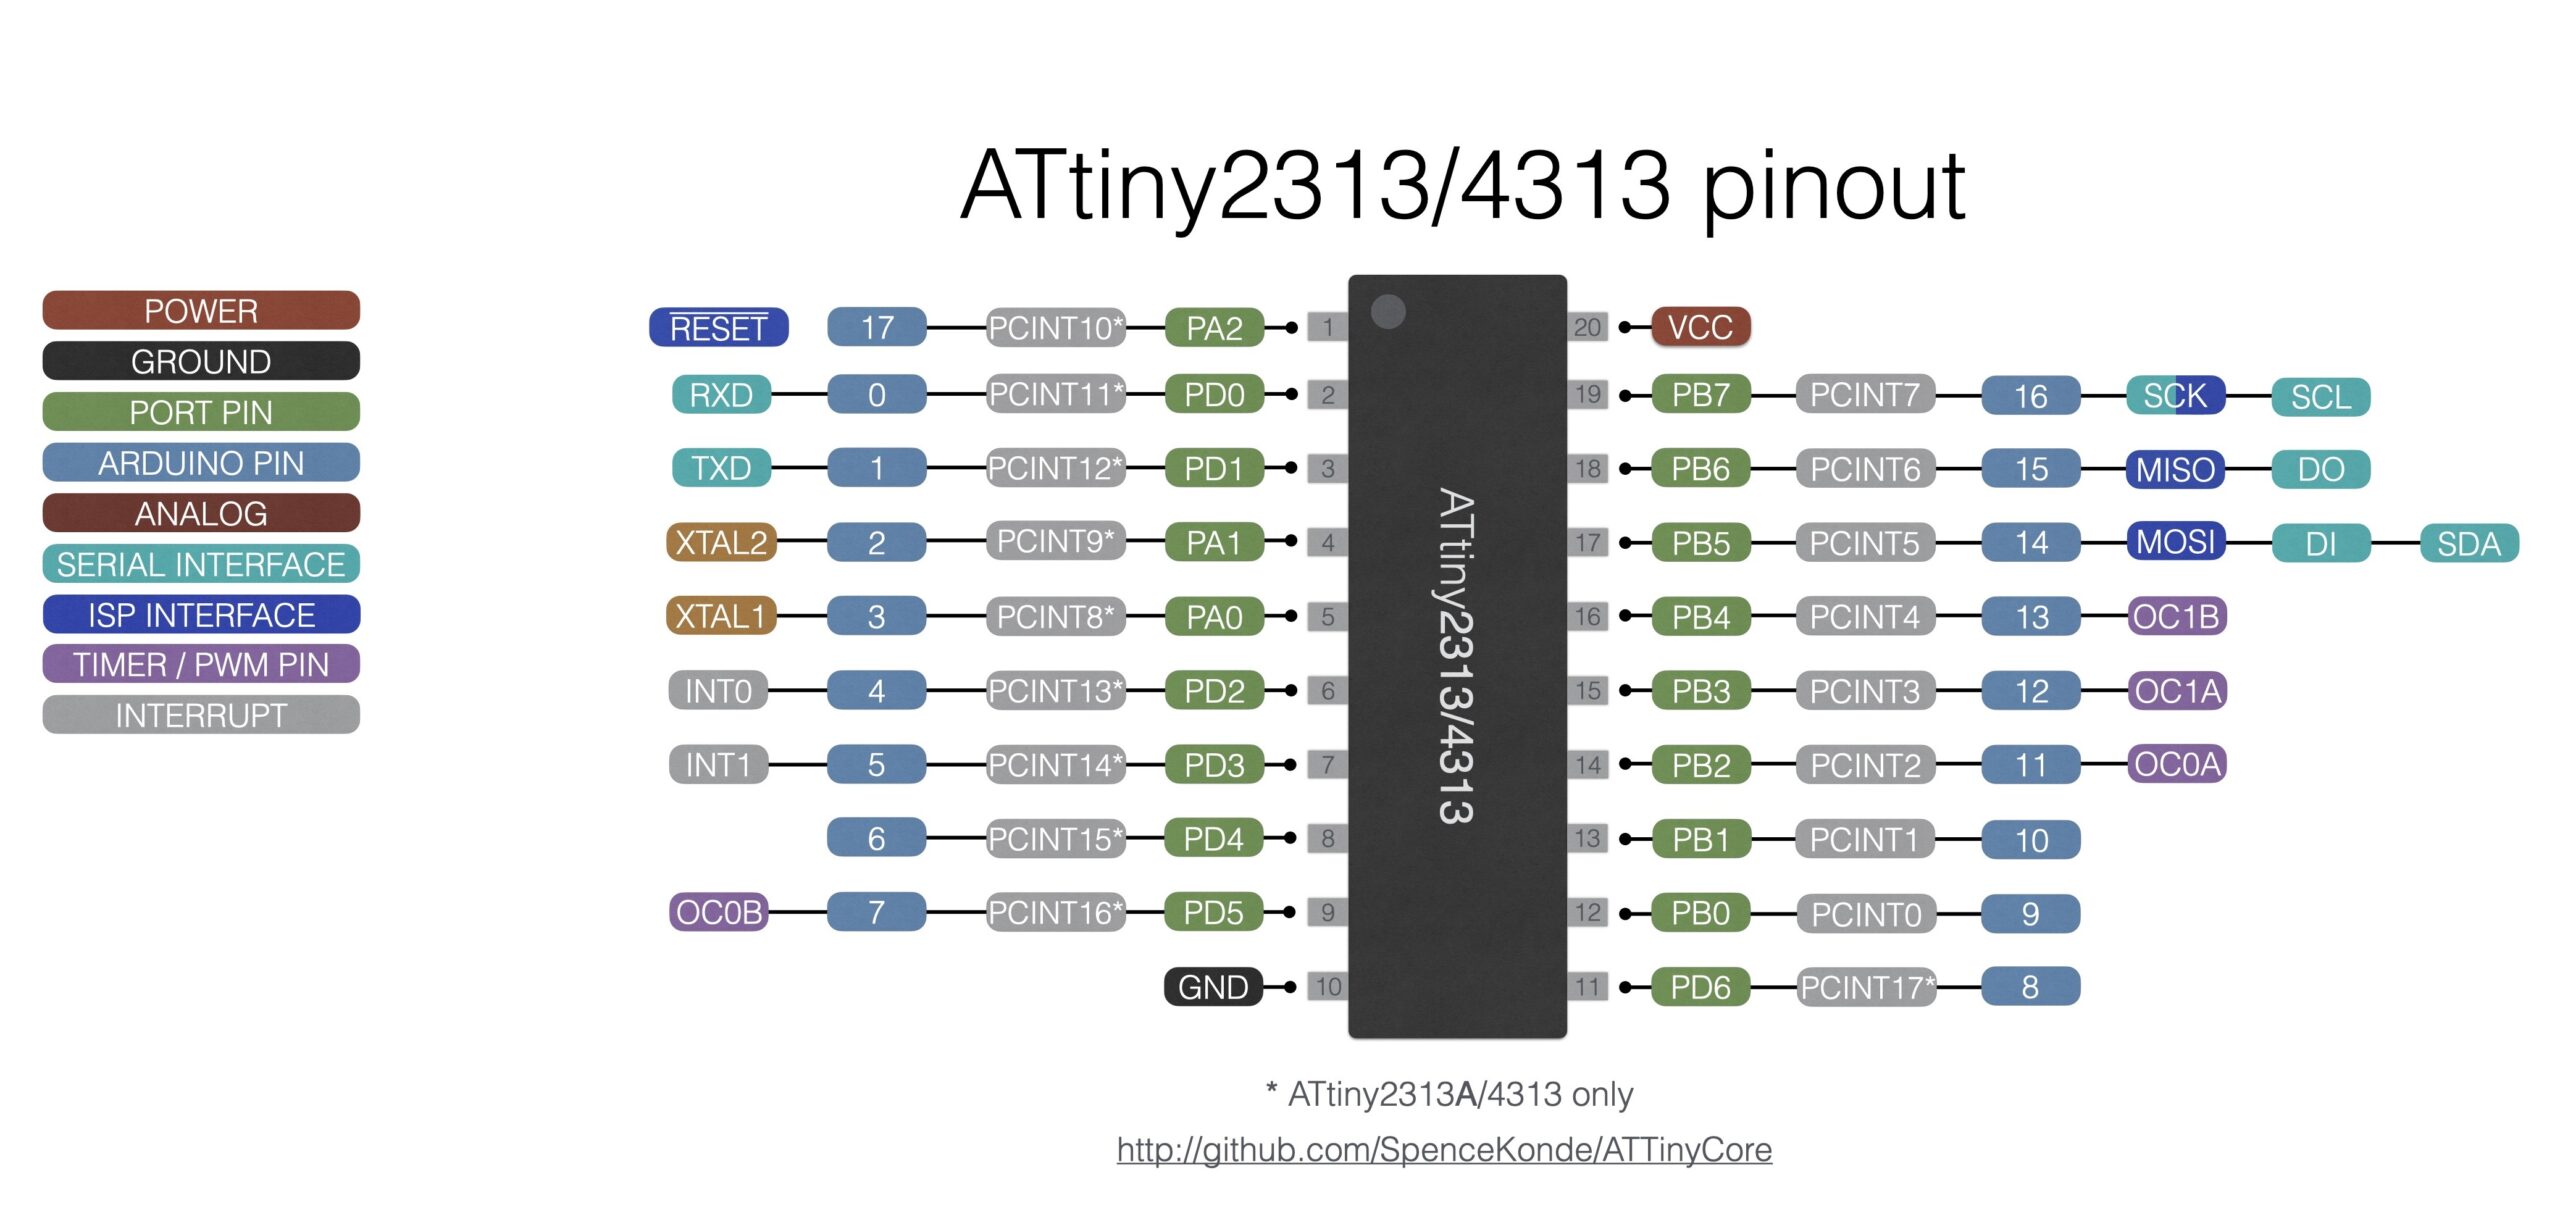
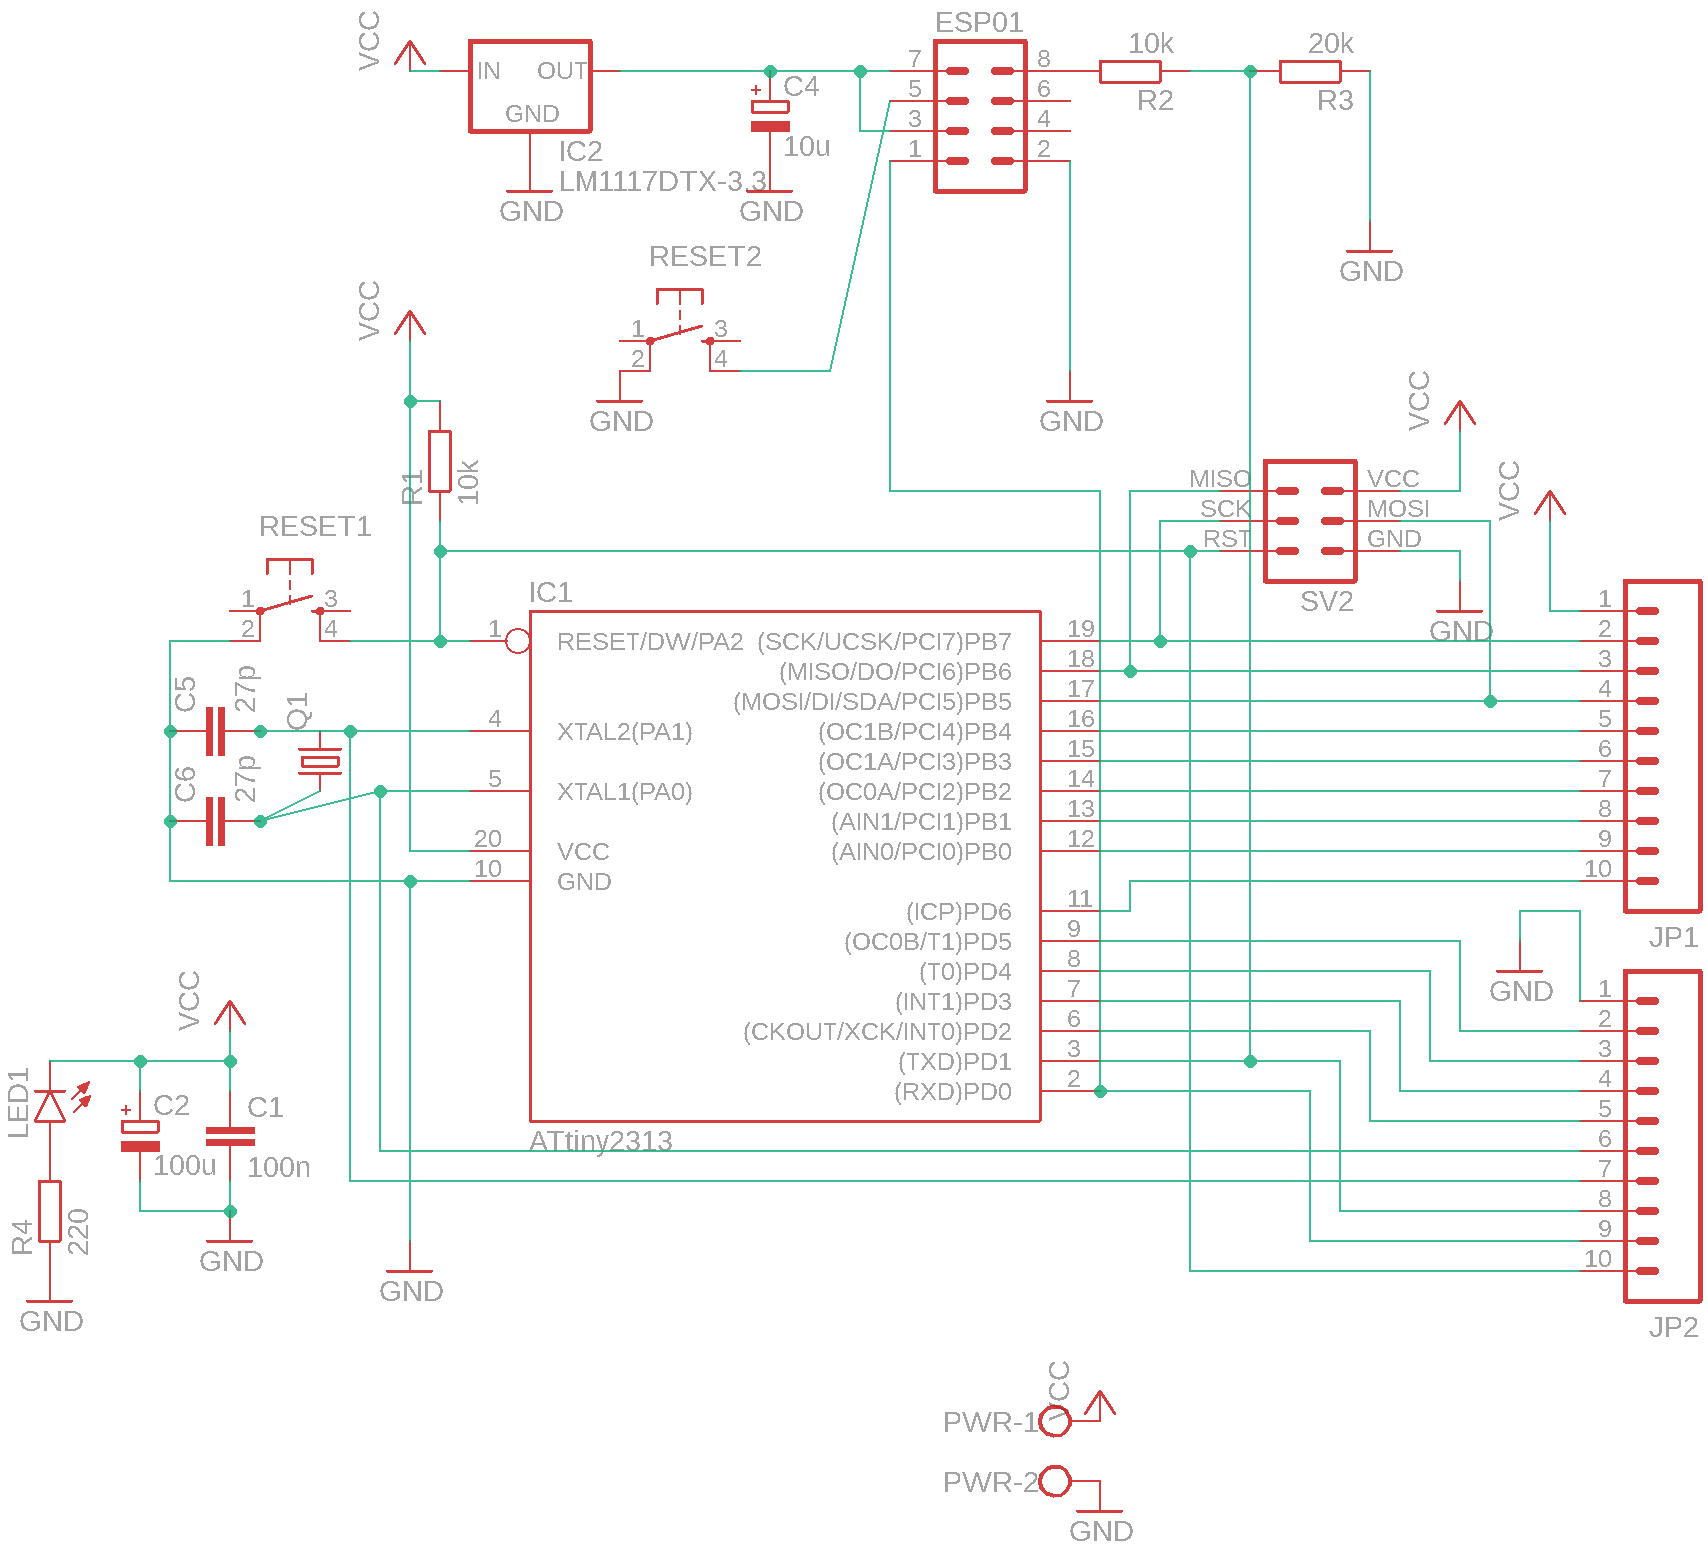
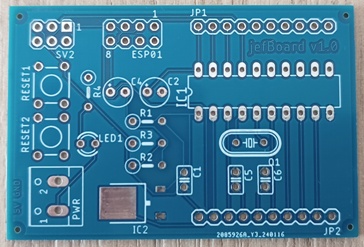
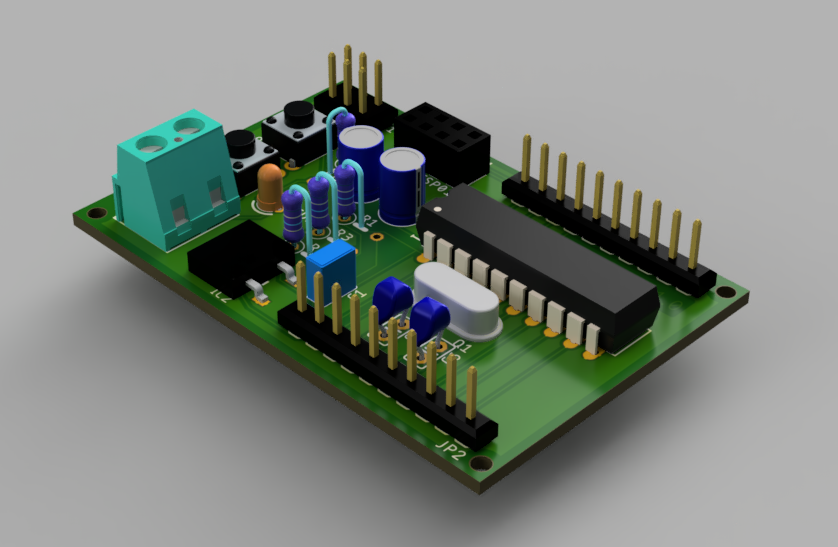
JefBoard è una scheda di sviluppo basata sul microcontroller Attiny2313 della ATMEL. Si presta allo sviluppo di applicazioni di varia natura e integra la predisposizione per la scheda WiFI ESP-01 (Opzionale) e il connettore per la programmazione ISP dell’Attiny2313.
Alcune caratteristiche:
JefBoard espone tutti i pin dell’Attiny2313 per il loro utilizzo.
JefBoard permette la realizzazione di applicazioni con supporto WiFi (il modulo ESP-01 comunica tramite connessione seriale con l’Attiny2313).
JefBoard può essere assemblata anche senza l’ESP-01 e relativi componenti di alimentazione se non si necessita di supporto WiFi abbassando ulteriormente il costo.
JefBoard è una scheda di piccole dimensioni 6×4 cm.
In ambiente Windows vi consiglio di utilizzare Atmel Studio 7 ma sembra che recentemente sia stato sostituito da un altro prodotto: https://www.microchip.com/en-us/tools-resources/develop/microchip-studio.
Se utilizzate Atmel Studio ricordate di selezionare l’Attiny2313a come chip durante la creazione del progetto ed eseguire i seguenti step:
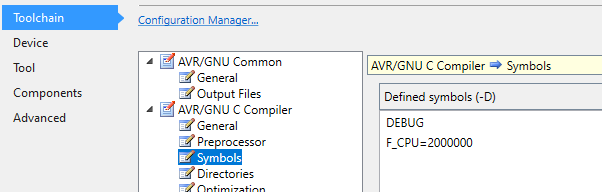
Project->Properties->Toolchain->AVR/GNU C Compiler->Symbols: aggiungere F_CPU=2000000 (In questo caso la frequenza di clock è di 2MHZ)
Modificare le righe seguenti nel file Makefile (ATTENZIONE: la riga FUSES deve essere identica alle impostazioni di FUSE Bits dell’Attiny2313; in questo esempio si utilizza un quarzo esterno da 4MHZ):
Assicurarsi di aver correttamente collegato il programmatore al computer e di aver installato i driver per il suo funzionamento (su Mac non è necessario installare driver)
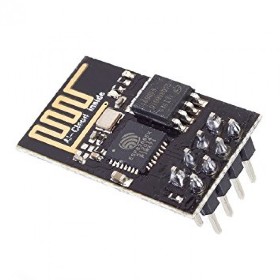
L’ESP01 è un modulo SOC basato sul chip ESP8266 che permette di aggiungere il supporto al WIFI in modo semplice ed economico.
Prima di inserirlo sulla jefBoard è necessario fare una precisazione:
L’ESP01 viene fornito generalmente con un firmware dotato di soli comandi AT per cui prima di utilizzarlo nei nostri progetti è necessario caricare il firmware nodeMCU (https://it.wikipedia.org/wiki/NodeMCU). Con questo firmware è possibile programmare facilmente l’ESP01 tramite linguaggio LUA ed è possibile compilare una versione custom di nodeMCU con il supporto delle librerie/funzionalità necessarie in base all’utilizzo su https://nodemcu-build.com.
E’ necessario inoltre dotarsi di un adattore USB seriale TTL:
Istruzioni per l’installazione di esptool su MACOSX:
Assicurarsi di avere Python 1.7 o successivo installato sul sistema
Spostarsi sulla directory appena scompattata ed eseguire:
sudo python setup.py install
Istruzioni per flash nodemcu su ESP01
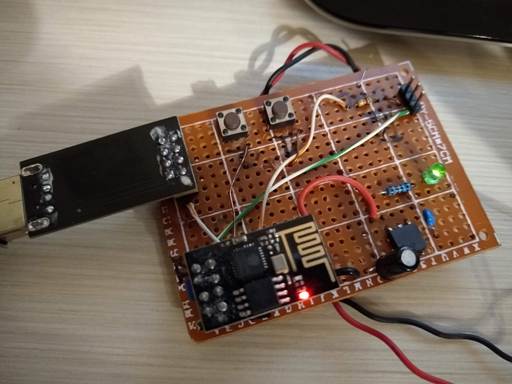
Esistono tanti modi per abilitare la modalità flash su ESP-01 (una ricerca su google è altamente consigliata…). Tempo fa ho realizzato una scheda che per comodità mi permette di riavviare tramite reset l’ESP01 (pulsante 1) mentre metto a massa il pin GPIO0 (pulsante 2):
Posizionare l’ESP01 e l’interfaccia seriale/USB sulla scheda di programmazione:
Per settare l’ESP01 in modalità flash tenere premuto il pulsante 2 e contemporaneamente effettuare un reset premendo e rilasciando il pulsante 1; dopo qualche istante rilasciare il pulsante 2.
Effettuare il comando (nodemcu_base_int.bin è il nome del file del firmware nodemcu da flashare vedi cartella esp8266):
Una volta caricato il firmware nodeMCU è possibile caricare gli script LUA. Il file denominato init.lua viene caricato all’avvio in maniera automatica.
E’ possibile utilizzare il software ESPlorer (https://github.com/4refr0nt/ESPlorer) sia per caricare sia gli script LUA che per gestire al meglio l’ESP01.
Utilizzo di jefBoard come server WIFI
In questo caso l’ESP01 funge da server in ascolto sulla porta 8080 tramite connessione WIFI; Ricevuto il comando lo inoltra tramite la connessione seriale verso l’Attiny2313.
Per questo utilizzo è necessario che la scheda sia equipaggiata con l’ESP01 aggiornata con il firmware nodeMCU, ed i relativi componenti. Di seguito un esempio di file init.lua (da caricare sull’ESP01) e del codice da utilizzare sull’Attiny2313:
init.lua (ESP01)
wifi.setmode(wifi.SOFTAP)
cfg={}
cfg.ssid="jefBoard"
wifi.ap.config(cfg)

uart.setup(0, 9600, 8, uart.PARITY_NONE, uart.STOPBITS_1, 1)

sv = net.createServer(net.TCP, 30)

function receiver(sck, data)
  print(data)  --senda data to jefBoard by serial
end

if sv then
  sv:listen(8080, function(conn)
    conn:on("receive", receiver)
  end)
end
main.c (jefBoard/Attiny2313)
#define F_CPU 4000000 UL // 4 MHz Crystal

#include <avr/io.h>
#include <util/delay.h>
#include <avr/interrupt.h>

// Define baud rate
#define USART_BAUDRATE 9600
#define BAUD_PRESCALE(((F_CPU / (USART_BAUDRATE * 16 UL))) - 1)

volatile unsigned char value;
/* This variable is volatile so both main and RX interrupt can use it.
 It could also be a uint8_t type */

/* Interrupt Service Routine for Receive Complete
 NOTE: vector name changes with different AVRs see AVRStudio -
 Help - AVR-Libc reference - Library Reference - <avr/interrupt.h>: Interrupts
 for vector names other than USART_RX_vect for Attiny2313 */

void dosomething(); //Exec something

void USART_Init(void) {
  // Set baud rate
  UBRRL = BAUD_PRESCALE; // Load lower 8-bits into the low byte of the UBRR register
  UBRRH = (BAUD_PRESCALE >> 8);
  /* Load upper 8-bits into the high byte of the UBRR register
   Default frame format is 8 data bits, no parity, 1 stop bit
   to change use UCSRC, see AVR datasheet*/

  // Enable receiver and transmitter and receive complete interrupt
  UCSRB = ((1 << TXEN) | (1 << RXEN) | (1 << RXCIE));
}

void USART_SendByte(uint8_t u8Data) {

  // Wait until last byte has been transmitted
  while ((UCSRA & (1 << UDRE)) == 0);

  // Transmit data
  UDR = u8Data;
}

// not being used but here for completeness
// Wait until a byte has been received and return received data
uint8_t USART_ReceiveByte() {
  while ((UCSRA & (1 << RXC)) == 0);
  return UDR;
}

ISR(USART_RX_vect) {
  if (UDR != 0x0A) value = UDR; //read UART register into value except <RETURN> key
}

void dosomething() {
  //Exec something
}

int main(void) {

  USART_Init(); // Initialise USART
  sei(); // enable all interrupts

  //If received data from serial match 'd' char exec dosomething() function
  while (1) {
    if (value == 0x64) dosomething(); //ASCII for 'd'
  }

  return 0;
}
JefBoard è una scheda di sviluppo basata sul microcontroller Attiny2313 della ATMEL. Si presta allo sviluppo di applicazioni di varia natura e integra la predisposizione per la scheda WiFI ESP-01 (Opzionale) e il connettore per la programmazione ISP dell’Attiny2313.
Alcune caratteristiche:
JefBoard espone tutti i pin dell’Attiny2313 per il loro utilizzo.
JefBoard permette la realizzazione di applicazioni con supporto WiFi (il modulo ESP-01 comunica tramite connessione seriale con l’Attiny2313).
JefBoard può essere assemblata anche senza l’ESP-01 e relativi componenti di alimentazione se non si necessita di supporto WiFi abbassando ulteriormente il costo.
JefBoard è una scheda di piccole dimensioni 6×4 cm.
In ambiente Windows vi consiglio di utilizzare Atmel Studio 7 ma sembra che recentemente sia stato sostituito da un altro prodotto: https://www.microchip.com/en-us/tools-resources/develop/microchip-studio.
Se utilizzate Atmel Studio ricordate di selezionare l’Attiny2313a come chip durante la creazione del progetto ed eseguire i seguenti step:
Project->Properties->Toolchain->AVR/GNU C Compiler->Symbols: aggiungere F_CPU=2000000 (In questo caso la frequenza di clock è di 2MHZ)
Modificare le righe seguenti nel file Makefile (ATTENZIONE: la riga FUSES deve essere identica alle impostazioni di FUSE Bits dell’Attiny2313; in questo esempio si utilizza un quarzo esterno da 4MHZ):
Assicurarsi di aver correttamente collegato il programmatore al computer e di aver installato i driver per il suo funzionamento (su Mac non è necessario installare driver)
L’ESP01 è un modulo SOC basato sul chip ESP8266 che permette di aggiungere il supporto al WIFI in modo semplice ed economico.
Prima di inserirlo sulla jefBoard è necessario fare una precisazione:
L’ESP01 viene fornito generalmente con un firmware dotato di soli comandi AT per cui prima di utilizzarlo nei nostri progetti è necessario caricare il firmware nodeMCU (https://it.wikipedia.org/wiki/NodeMCU). Con questo firmware è possibile programmare facilmente l’ESP01 tramite linguaggio LUA ed è possibile compilare una versione custom di nodeMCU con il supporto delle librerie/funzionalità necessarie in base all’utilizzo su https://nodemcu-build.com.
E’ necessario inoltre dotarsi di un adattore USB seriale TTL:
Istruzioni per l’installazione di esptool su MACOSX:
Assicurarsi di avere Python 1.7 o successivo installato sul sistema
Spostarsi sulla directory appena scompattata ed eseguire:
sudo python setup.py install
Istruzioni per flash nodemcu su ESP01
Esistono tanti modi per abilitare la modalità flash su ESP-01 (una ricerca su google è altamente consigliata…). Tempo fa ho realizzato una scheda che per comodità mi permette di riavviare tramite reset l’ESP01 (pulsante 1) mentre metto a massa il pin GPIO0 (pulsante 2):
Posizionare l’ESP01 e l’interfaccia seriale/USB sulla scheda di programmazione:
Per settare l’ESP01 in modalità flash tenere premuto il pulsante 2 e contemporaneamente effettuare un reset premendo e rilasciando il pulsante 1; dopo qualche istante rilasciare il pulsante 2.
Effettuare il comando (nodemcu_base_int.bin è il nome del file del firmware nodemcu da flashare vedi cartella esp8266):
Una volta caricato il firmware nodeMCU è possibile caricare gli script LUA. Il file denominato init.lua viene caricato all’avvio in maniera automatica.
E’ possibile utilizzare il software ESPlorer (https://github.com/4refr0nt/ESPlorer) sia per caricare sia gli script LUA che per gestire al meglio l’ESP01.
Utilizzo di jefBoard come server WIFI
In questo caso l’ESP01 funge da server in ascolto sulla porta 8080 tramite connessione WIFI; Ricevuto il comando lo inoltra tramite la connessione seriale verso l’Attiny2313.
Per questo utilizzo è necessario che la scheda sia equipaggiata con l’ESP01 aggiornata con il firmware nodeMCU, ed i relativi componenti. Di seguito un esempio di file init.lua (da caricare sull’ESP01) e del codice da utilizzare sull’Attiny2313:
init.lua (ESP01)
wifi.setmode(wifi.SOFTAP)
cfg={}
cfg.ssid="jefBoard"
wifi.ap.config(cfg)

uart.setup(0, 9600, 8, uart.PARITY_NONE, uart.STOPBITS_1, 1)

sv = net.createServer(net.TCP, 30)

function receiver(sck, data)
  print(data)  --senda data to jefBoard by serial
end

if sv then
  sv:listen(8080, function(conn)
    conn:on("receive", receiver)
  end)
end
main.c (jefBoard/Attiny2313)
#define F_CPU 4000000 UL // 4 MHz Crystal

#include <avr/io.h>
#include <util/delay.h>
#include <avr/interrupt.h>

// Define baud rate
#define USART_BAUDRATE 9600
#define BAUD_PRESCALE(((F_CPU / (USART_BAUDRATE * 16 UL))) - 1)

volatile unsigned char value;
/* This variable is volatile so both main and RX interrupt can use it.
 It could also be a uint8_t type */

/* Interrupt Service Routine for Receive Complete
 NOTE: vector name changes with different AVRs see AVRStudio -
 Help - AVR-Libc reference - Library Reference - <avr/interrupt.h>: Interrupts
 for vector names other than USART_RX_vect for Attiny2313 */

void dosomething(); //Exec something

void USART_Init(void) {
  // Set baud rate
  UBRRL = BAUD_PRESCALE; // Load lower 8-bits into the low byte of the UBRR register
  UBRRH = (BAUD_PRESCALE >> 8);
  /* Load upper 8-bits into the high byte of the UBRR register
   Default frame format is 8 data bits, no parity, 1 stop bit
   to change use UCSRC, see AVR datasheet*/

  // Enable receiver and transmitter and receive complete interrupt
  UCSRB = ((1 << TXEN) | (1 << RXEN) | (1 << RXCIE));
}

void USART_SendByte(uint8_t u8Data) {

  // Wait until last byte has been transmitted
  while ((UCSRA & (1 << UDRE)) == 0);

  // Transmit data
  UDR = u8Data;
}

// not being used but here for completeness
// Wait until a byte has been received and return received data
uint8_t USART_ReceiveByte() {
  while ((UCSRA & (1 << RXC)) == 0);
  return UDR;
}

ISR(USART_RX_vect) {
  if (UDR != 0x0A) value = UDR; //read UART register into value except <RETURN> key
}

void dosomething() {
  //Exec something
}

int main(void) {

  USART_Init(); // Initialise USART
  sei(); // enable all interrupts

  //If received data from serial match 'd' char exec dosomething() function
  while (1) {
    if (value == 0x64) dosomething(); //ASCII for 'd'
  }

  return 0;
}
During this six-week Chingu voyage, our team will design, develop, and launch BrightPath, a custom platform for online courses that will cover niche tech topics not currently addressed elsewhere.
All courses—including videos, readings, activities, and quizzes—will be freely available to the public. Users can log in to access course content and track their progress.
Upon completing all required lessons and assessments for a given course, users will be issued a verified BrightPath certificate that can be shared on LinkedIn and other web platforms to demonstrate their achievement.
Our practical, project-based courses will help learners stay at the forefront of the ever-evolving tech landscape.
BrightPath is built to offer free, project-based learning experiences. Users will find interactive content, gain hands-on skills, and earn verifiable certificates that showcase their achievements.
Features
Free, Public Access: Courses are freely accessible to all users.
Personalized Learning: Login functionality enables users to track their progress.
Certificates of Completion: Highlight learning accomplishments on LinkedIn or other platforms.
Rich Content: Courses include videos, readings, activities, and assessments.
Tech Stack
Frontend: Next.js (hosted on Netlify)
Backend: Express.js (hosted on Railway)
Database: PostgreSQL
Other: OAuth Authentication
We invite you to explore the platform and join us in shaping the future of online learning! 🎓✨
Team Documents
You may find these helpful as you work together to organize your project.
Meeting – Sprint Retrospective, Review, and Planning –> ./docs/meeting-sprint_retrospective_review_and_planning.docx
Meeting – Sprint Open Topic Session –> ./docs/meeting-sprint_open_topic_session.docx
Our Team
Everyone on your team should add their name along with a link to their GitHub
& optionally their LinkedIn profiles below. Do this in Sprint #1 to validate
your repo access and to practice PR’ing with your team before you start
coding!
Check a GitHub repository for info about releases. With this
your code can react to the info returned.
Purpose
Restore a level of control to a creator who cares enough
about their content to implement a solution, like what
is found in this repository, when a platform limits their
choices. Necessity is the mother of invention
How it works
The Version Check Client fetches info from a GitHub repository
and looks for infomation in the repository’s ReadMe or Releases.
The two modes are explained below.
WARNING: The GitHub API throttles at 5000 requests per hour.
Please do not abuse.
Modes
ReadMe
The ReadMe mode fetches the README files from a repository.
The file can be named README.md or README. It is case insensitive.
If GitHub auto displays your readme file when browsing to your
repository then this code will work.
The content of the README file is parsed looking for html
comments in the format below.
<!-- name|version|IsDisabled -->
Field
Description
name
This value is mapped to ReadMeValues.Name
version
This value is mapped to ReadMeValues.Version
IsDisabled
This value is mapped to ReadMeValues.IsDisabled as true or false. It only maps to true if the value is IsDisabled. Anything else maps to false.
Example Readme.md
In this example all pre-v1.0.0 version of the digitalroot.mods.betterclubs mod are disabled.
The Releases mode fetches all the Releases from a repository.
The content of the Releases (body) is parsed looking for an html
comment in the format below.
<!-- IsDisabled -->
Field
Description
Name of the release
This value is mapped to Release.Name
Tag name of the release
This value is mapped to Release.Tag
IsDisabled
This value is mapped to Release.IsDisabled as true or false. It only maps to true if <!-- IsDisabled --> is found in the release body. If it is not found then Release.IsDisabled is set to false.
Errors
If the VersionCheckClient encounters any errors, Results.IsErrored
is set to true and Results.Exception is set to the exception encountered.
There are many ways to use the this library. What an author does
with a disabled release is left up to the author. Here are a few examples.
ReadMe
// GitHub repository url format. https://github.com/githubtraining/hellogitworld// GitHub repository url format. https://github.com/{owner}/{name}// Create VersionCheckClientusingvarversionCheckClient=newVersionCheckClient("githubtraining","hellogitworld",VersionCheckMode.ReadMe);// Execute the requestvarresults=versionCheckClient.Execute();// Get the result for a specific name and version.varreadMeValues=results.ReadMeValues.FirstOrDefault(r =>r.Name=="digitalroot.mods.betterclubs"&&r.Version=="1.0.0");if(readMeValues?.IsDisabled==true){// The release is marked as disabled.// Add your code here for how you want to handle a disabled release.}else{// The release was not found or it is not marked as disabled.// Add your code here for how you want to handle an enabled release.}
Releases
// GitHub repository url format. https://github.com/githubtraining/hellogitworld// GitHub repository url format. https://github.com/{owner}/{name}// Create VersionCheckClientusingvarversionCheckClient=newVersionCheckClient("githubtraining","hellogitworld",VersionCheckMode.Releases);// Execute the requestvarresults=versionCheckClient.Execute();// Get the result for a specific tag.varrelease=results.Releases.FirstOrDefault(r =>r.Tag=="RELEASE_1.1");if(release?.IsDisabled==true){// The release is marked as disabled.// Add your code here for how you want to handle a disabled release.}else{// The release was not found or it is not marked as disabled.// Add your code here for how you want to handle an enabled release.}


 https://github.com/KennethanCeyer/hiss